Lithium on the cheap: build a 12v 280Ah (3.4kWh) LiFePo4 battery with BMS for less than 600$
This is a short guide to building the best value-for-money Lithium battery with BMS currently available on the market, using only components that you can source online from Alibaba or Aliexpress.
Readily made batteries with similar specs have a retail price that can reach 3000$ or more.
Note that delivery of certain components, primarily cells, can take four to six weeks.
As this is a DIY project, warranty varies across components. Cells (the main cost factor) have a 5 years warranty from the manufacturer.
Obvious disclaimer: this is an amateur DIY guide and it is solely meant to share knowledge. I do not offer guarantees nor take responsibility for the listed suppliers and for the process described below.
Specs
Here are the specs of the assembled battery:
| Nominal Voltage | 12V |
|---|---|
| Capacity | 280Ah |
| Cycle life | 3000+ cycles |
| Continuous discharge current | 100A (up to 280A by upgrading the BMS) |
| Continuous charge current | 50A (up to 280A by upgrading the BMS) |
| Maximum continuous load | 1.200W (up to 3.360W by upgrading the BMS) |
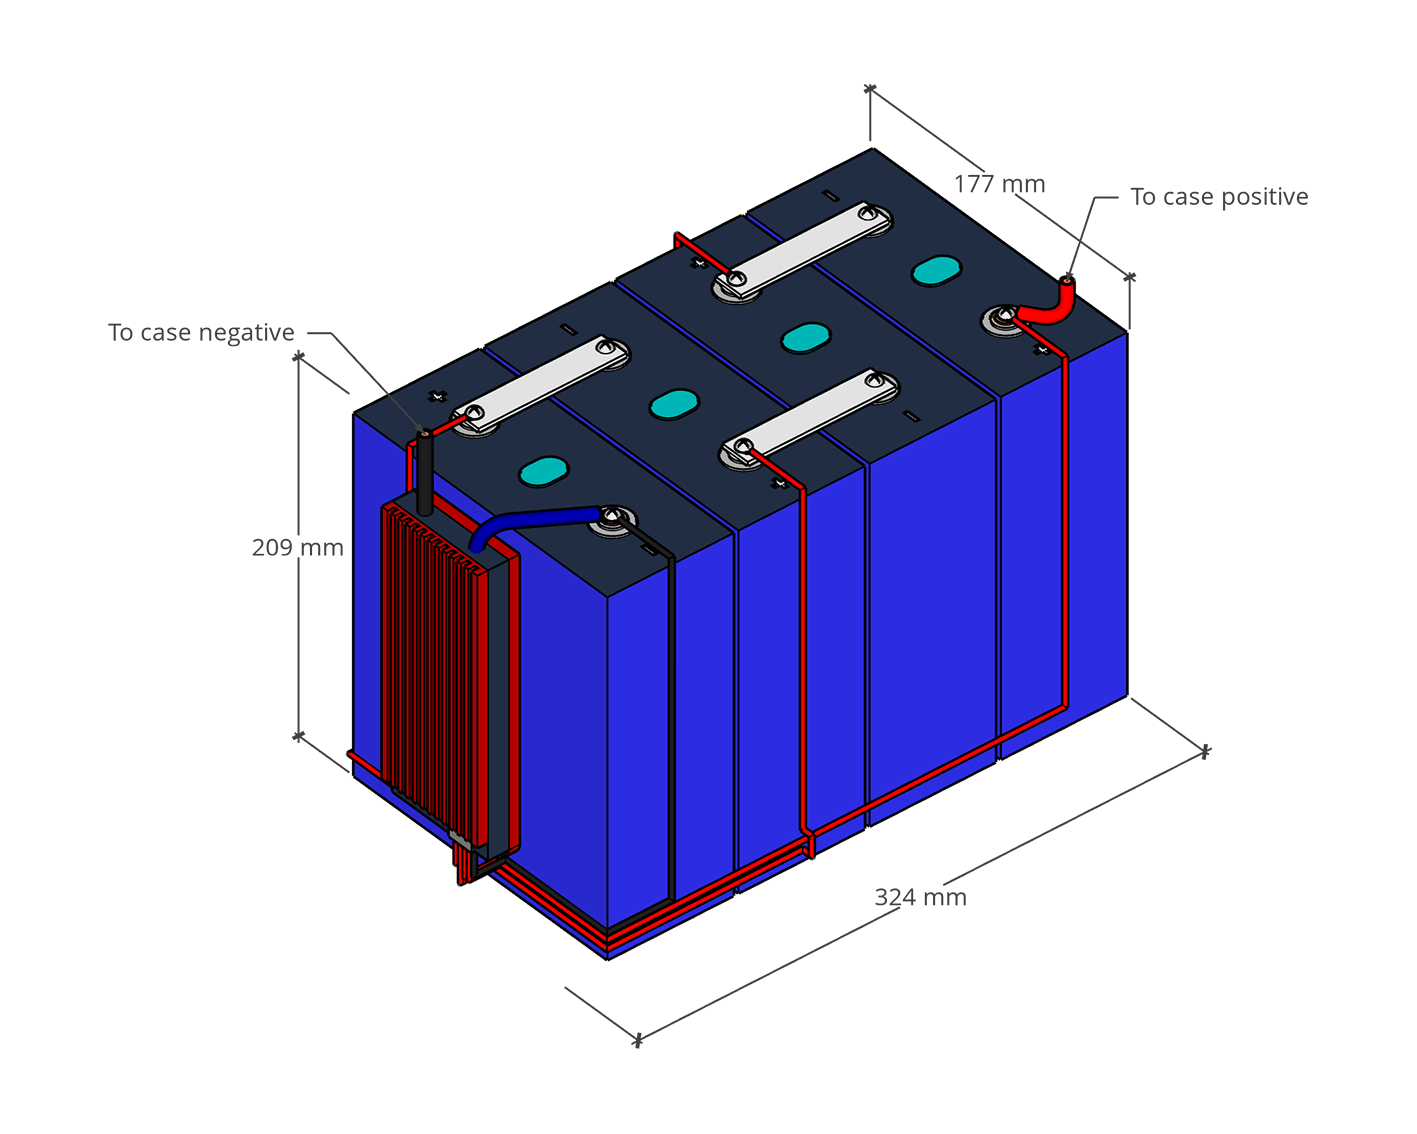
| Size (LxWxH) | 345 x 245 x 190 mm |
| Weight | ca. 22 kg |
| Over charge protection | Yes |
| Over discharge protection | Yes |
| Automatic balancing | Yes |
| Short circuit protection | Yes |
| Low temperature cutoff | Optional (two BMS options below) |
| Operating temperature | -20/+70 °C |
Shopping list
Below is literally everything you need in order to build and test your battery. Note that you might have to log into Alibaba in order to see shipping prices.
All quoted prices are approximate and include shipping (disclaimer: affiliate links below).
Bonus: you can get a 24$ Aliexpress coupon by signing up through this link.
Main components
| What | Approximate Price |
|---|---|
| 4x 280Ah LiFePo4 prismatic cells | 430$ (Buy it here) |
| 100A common port BMS | 38$ without low temperature protection (Buy it here) or 56$ with low temperature protection (Buy it here) |
| Fancy battery box* | 70$ (Buy it here) |
Materials
| What | Approximate Price |
|---|---|
| 6AWG wires (red and black, 50cm) | 9$ (Buy it here) |
| Large ring connectors (10 x SC16-6) | 4$ (Buy it here) |
| Small ring connectors (red ones) | 2$ (Buy it here) |
| Heat shrink tubing | 2$ (Buy it here) |
| Velcro strips (20mm) | 2$ (Buy it here) |
Tools
| What | Approximate Price |
|---|---|
| Hammer crimping tool | 16$ (Buy it here) |
| Crimping tool (YE-202B) | 8$ (Buy it here) |
| Multimeter | 7$ (Buy it here) |
Total: 588$ including tools
*You can save an extra 50$ if you source a box from your local hardware store. Minimum internal dimensions: 335 x 215 x 180 mm. You might need to get battery connectors (5$) if you decide to do so.
Assembly
Time needed: around two hours of work if it's your first time
-
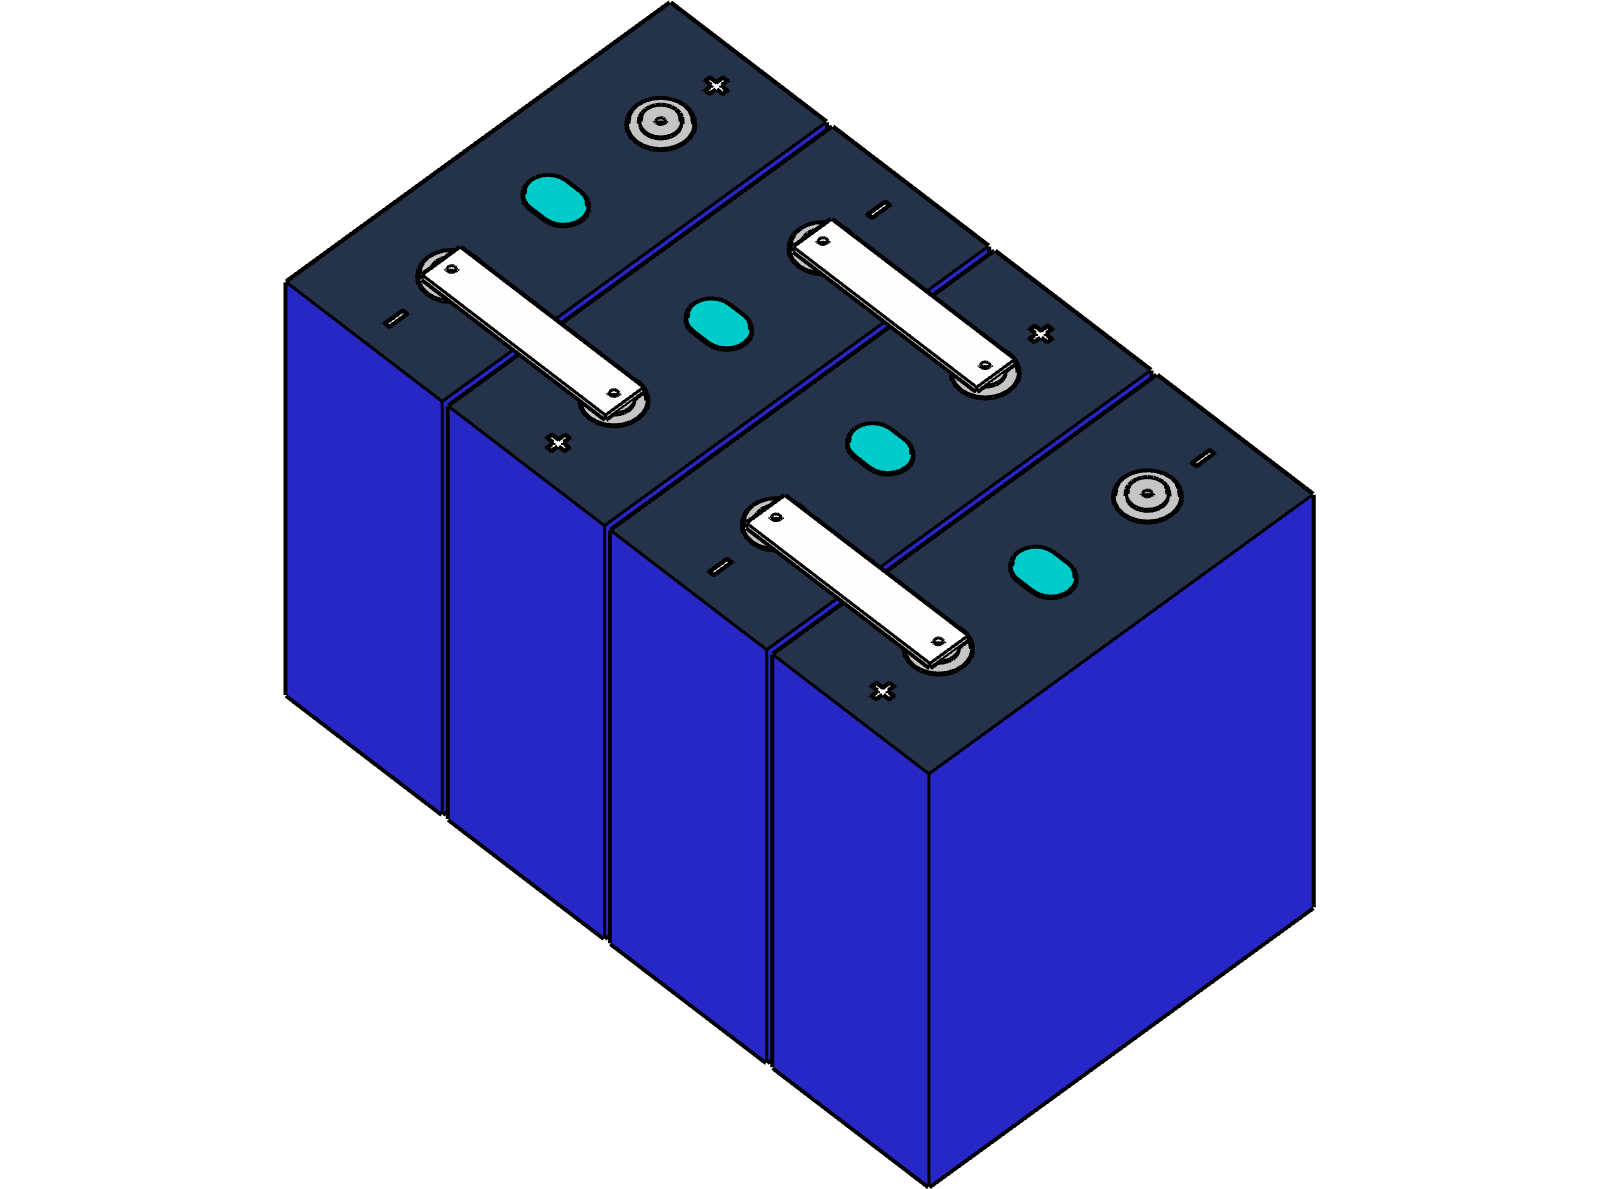
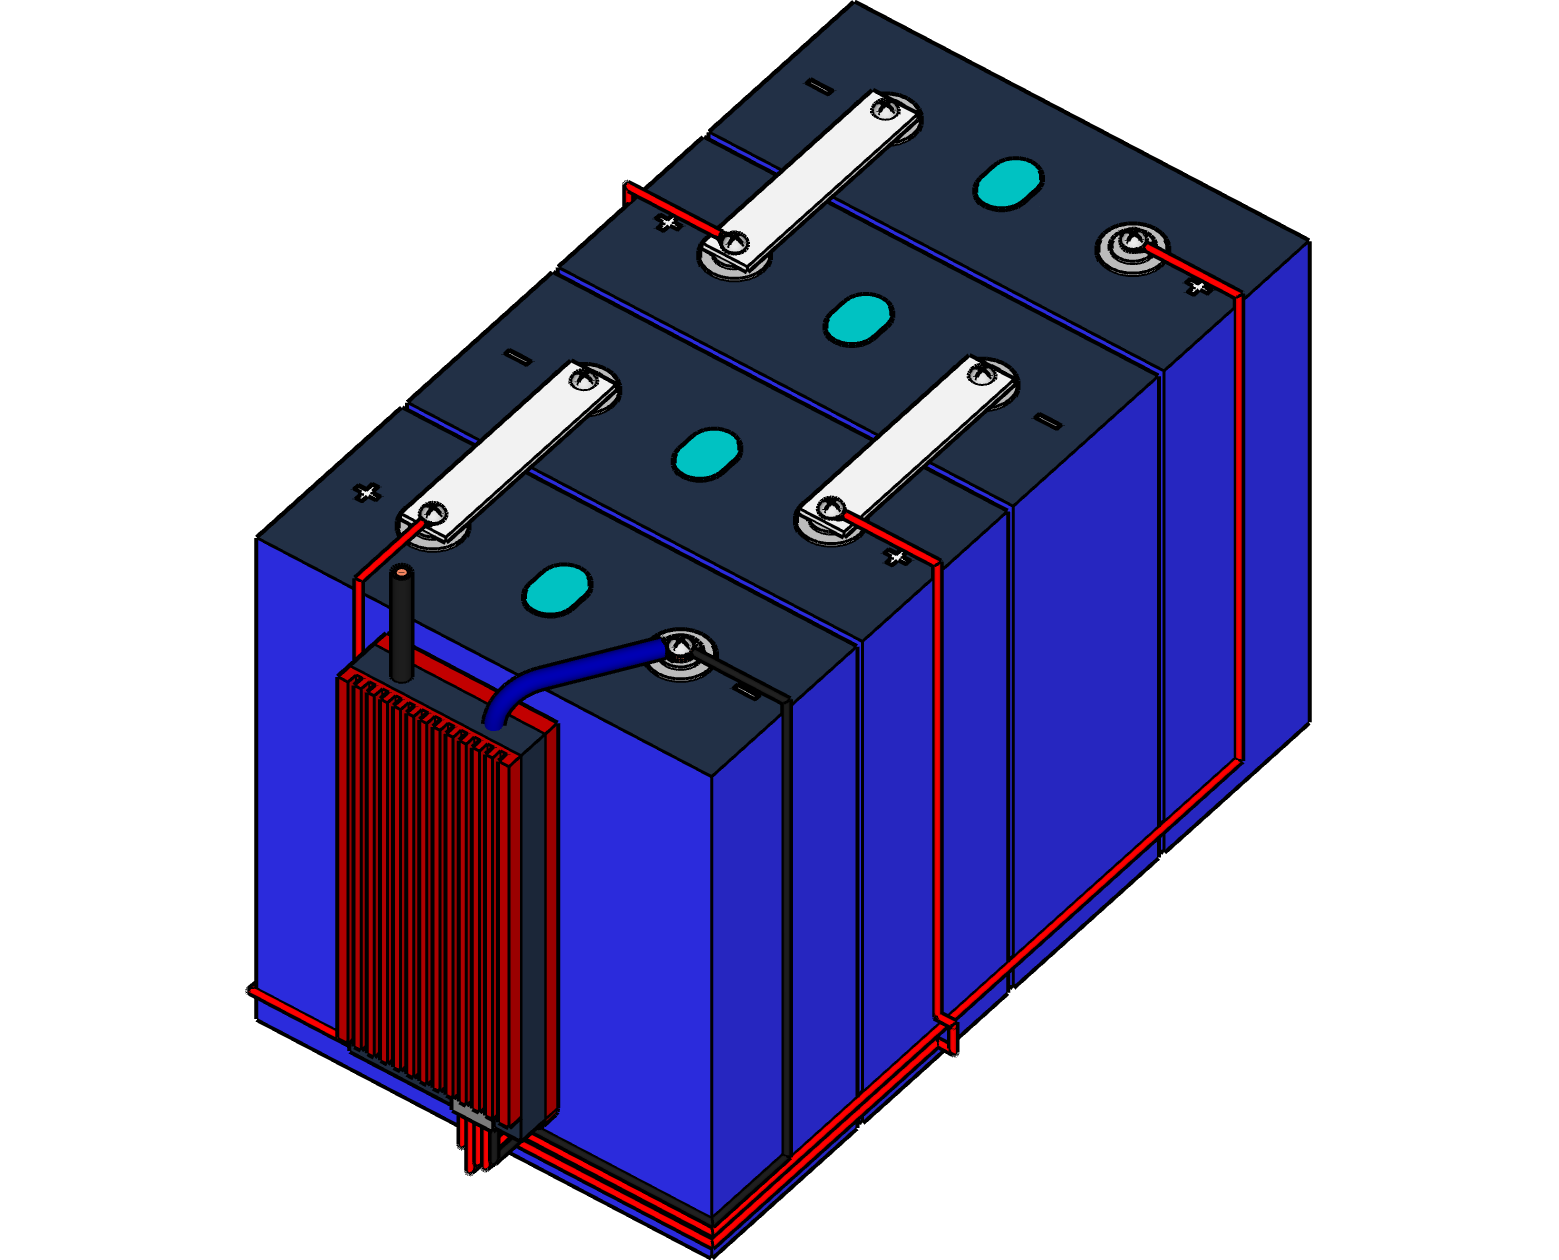
Assemble the four cells in a pack and connect them in series as shown in the picture. Use velcro strips between cells to hold them together. You will end up with a "main negative" and a "main positive" terminals for the pack (the only negative and positive terminal not connected to another cell)
-
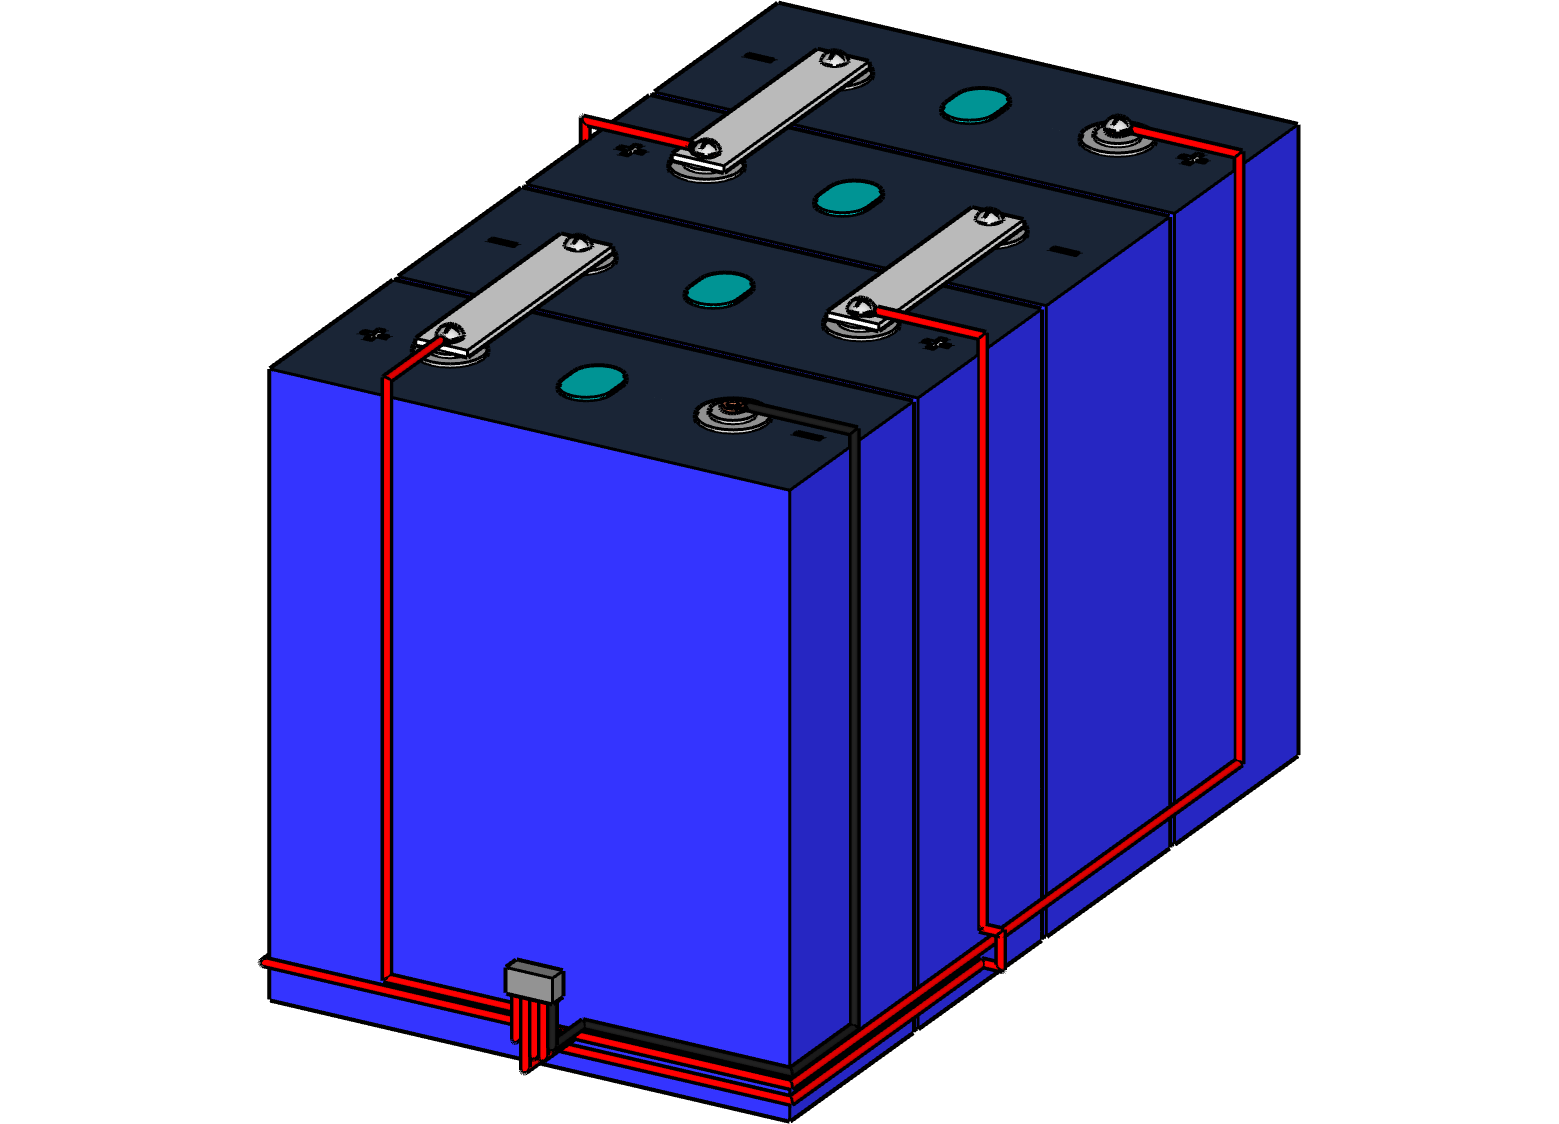
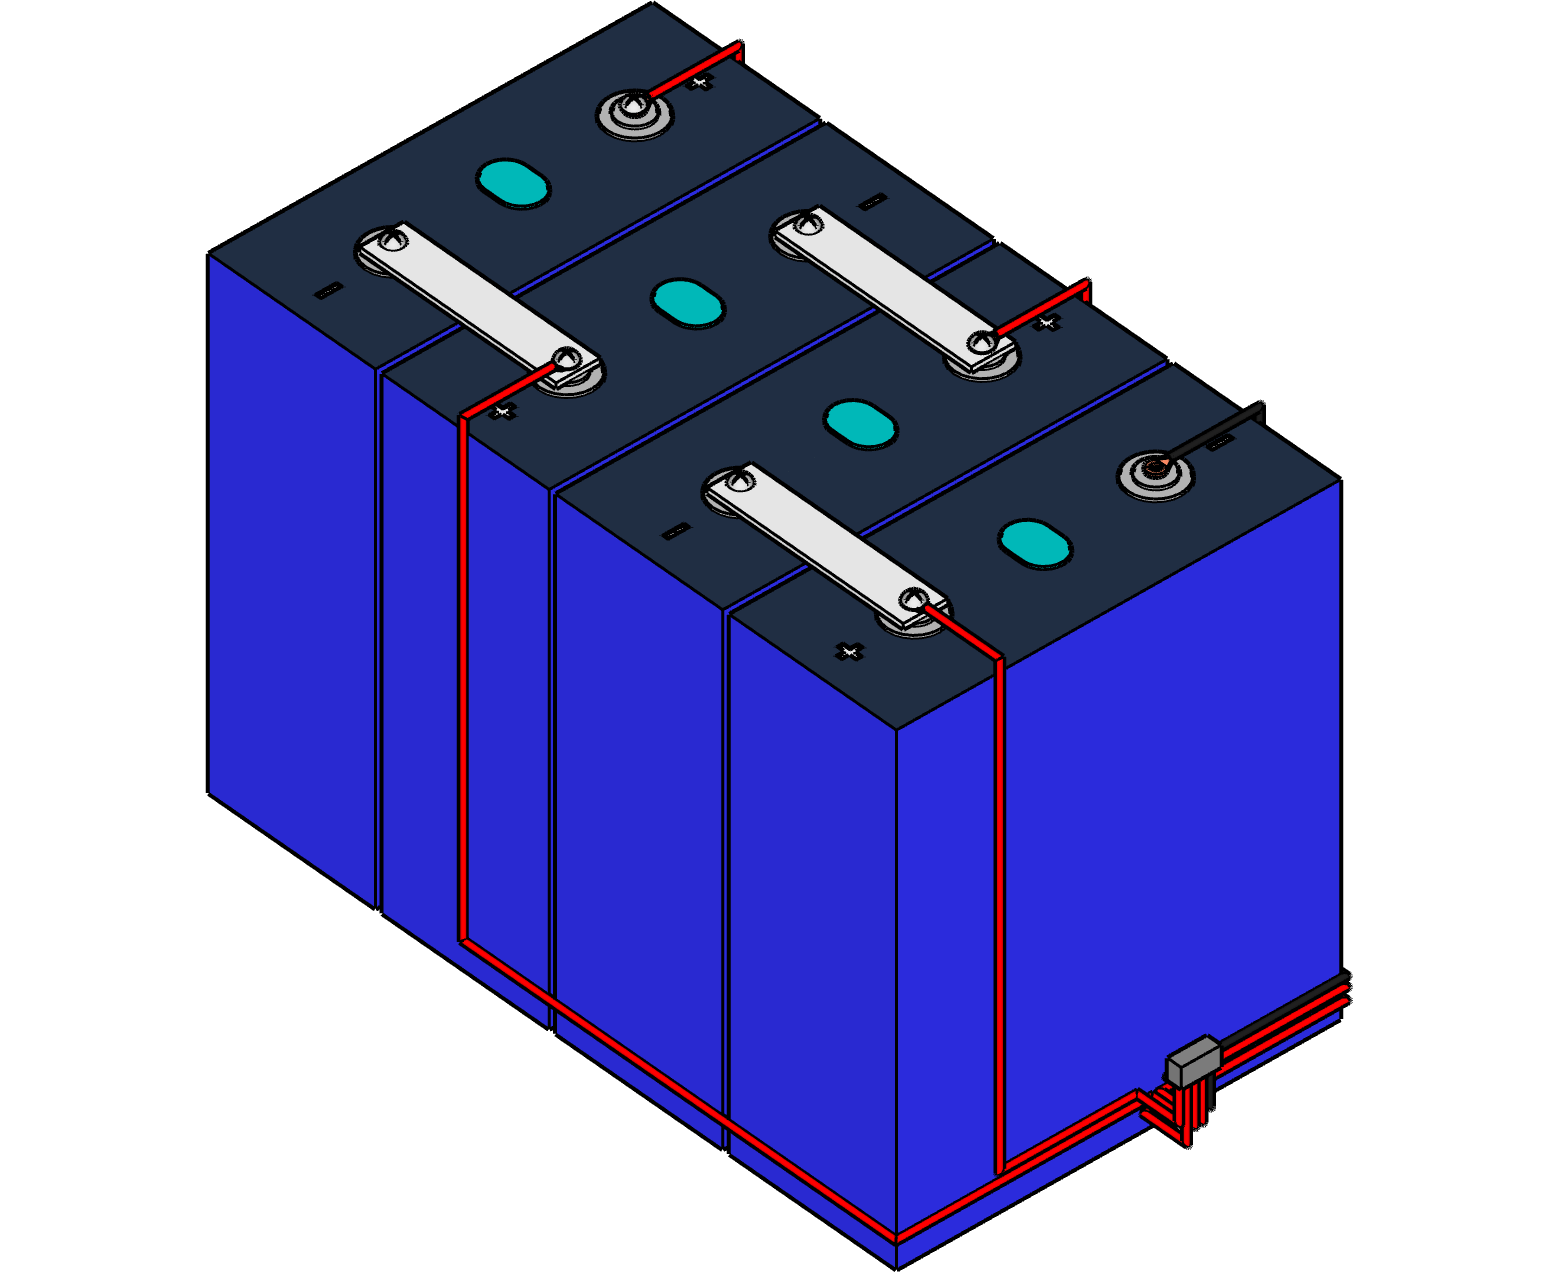
Unplug the BMS balancing wires (the five thin ones) from the BMS, crimp some small ring connectors to their ends and connected them to the cells: four red wires to the positive terminal of each cell and one black wire to the main negative terminal of the pack
-
Connect the BMS's black wire (marked as P-) to the negative terminal of the battery case and its blue wire (marked as B-) to the main negative of the battery pack. Plug the BMS's balancing wires into the BMS itself and secure the BMS to the cells with velcro strips
-
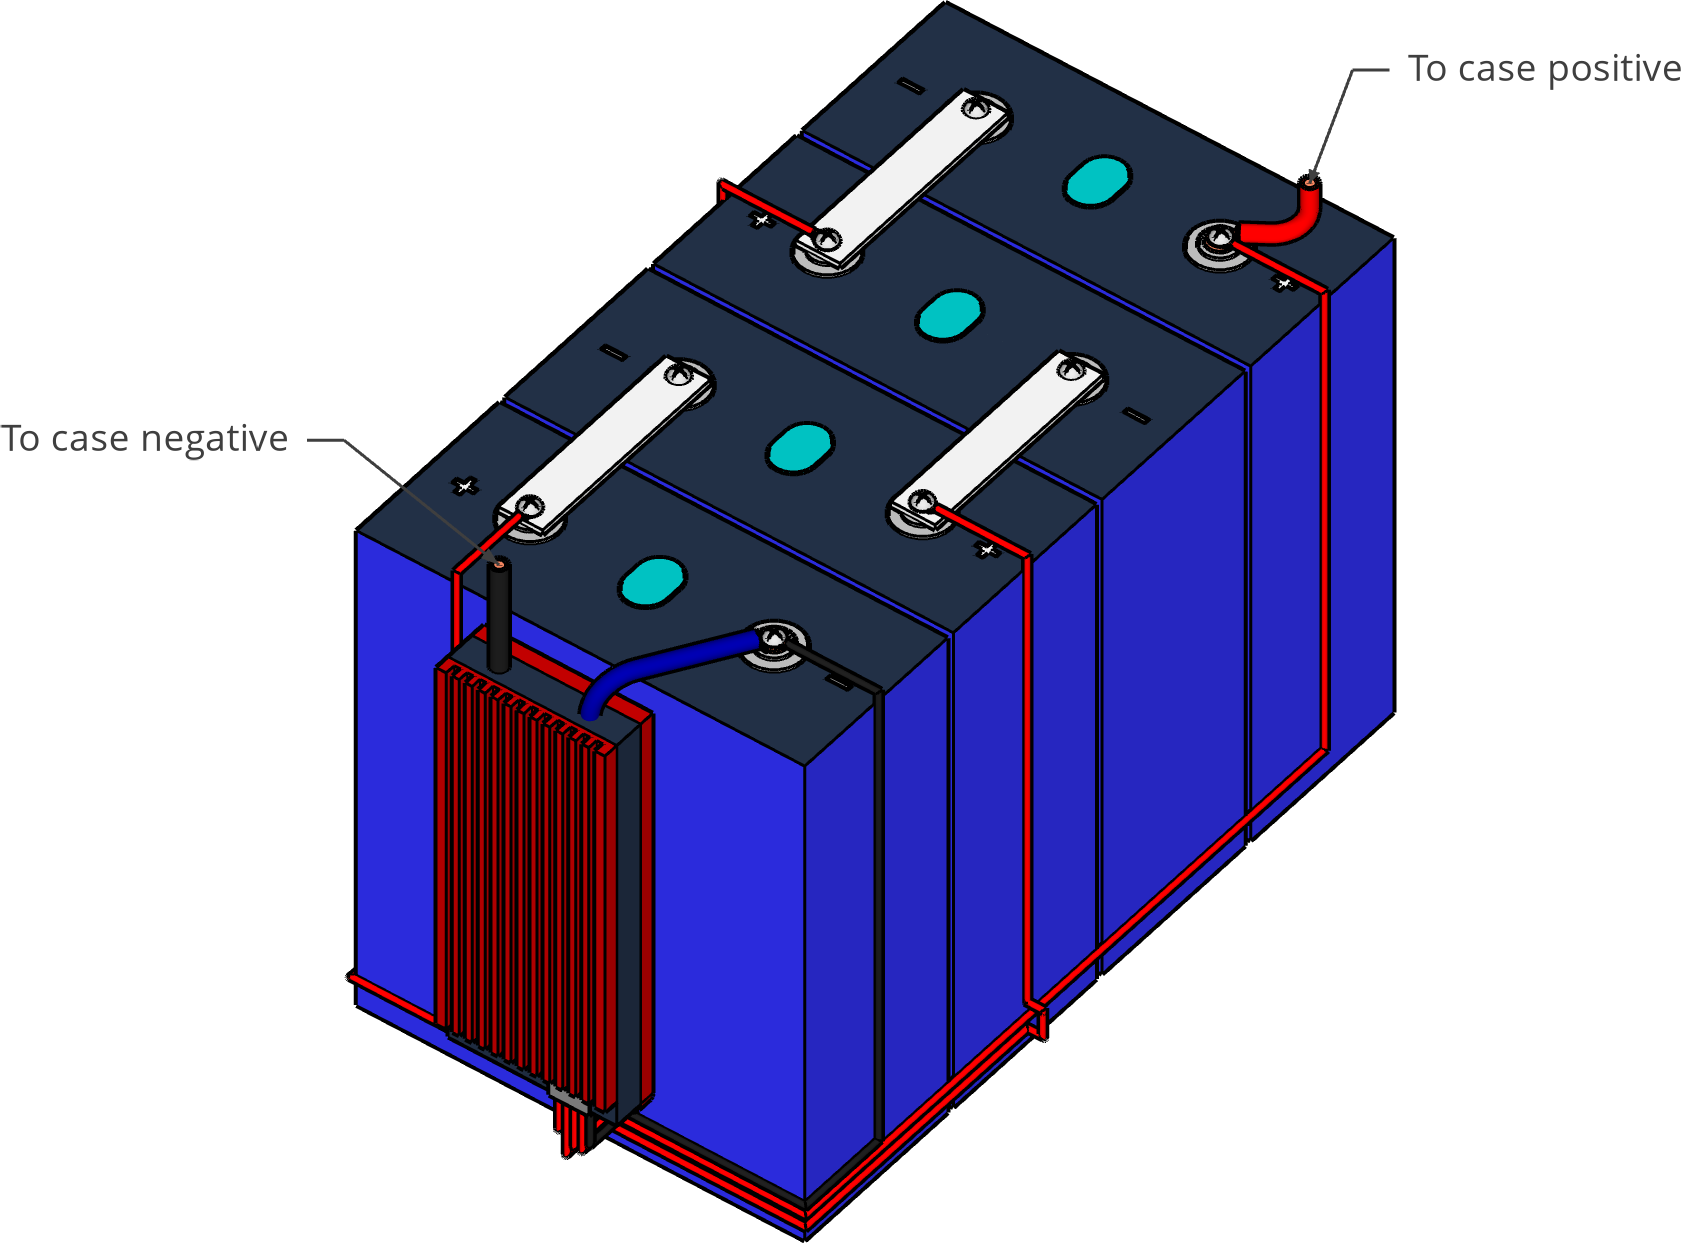
Use the hammer crimping tool to crimp two large ring connectors to the two ends of a 6AWG red wire. Connect one end of the wire to the battery pack’s main positive and the other end to the positive terminal of the battery case
-
With your multimeter, measure voltage between the >case’s positive and negative terminals and make sure it’s the same as measured between the pack’s main positive and negative (both should be between 12v and 14.4v). If not, check the BMS’s balancing wires are connected properly
-
Close the battery box and enjoy
You are done!
Safety notice
There appears to be a lot of misinformation about the safety of Lithium batteries online. While Li-ion cells do pose safety concerns, LiFePo4 (Lithium iron phosphate) is a different chemistry and it is proven to be safe and immune from explosion or ignition.
Here is a video showing how cells react under extreme circumstances. As you can see, even a flamethrower cannot get LiFePo4 cells to explode.
Note also that the reason why a battery is made of cells and a BMS is that the BMS will ensure none of the cells are ever over-charged or over-discharged. This way even the slightest concern of damaging cells by ways of too much current or load is addressed.
Bonus: top balancing your cells
If you want to ensure the maximum longevity of your battery and get the max capacity out of it, you should consider top balancing your cells before assembling them.
Top balancing means ensuring all four cells in your build are fully charged and at the same voltage, before going ahead and assembling them into a battery.
Here are the steps needed to top balance your cells (to be done before building the battery):
-
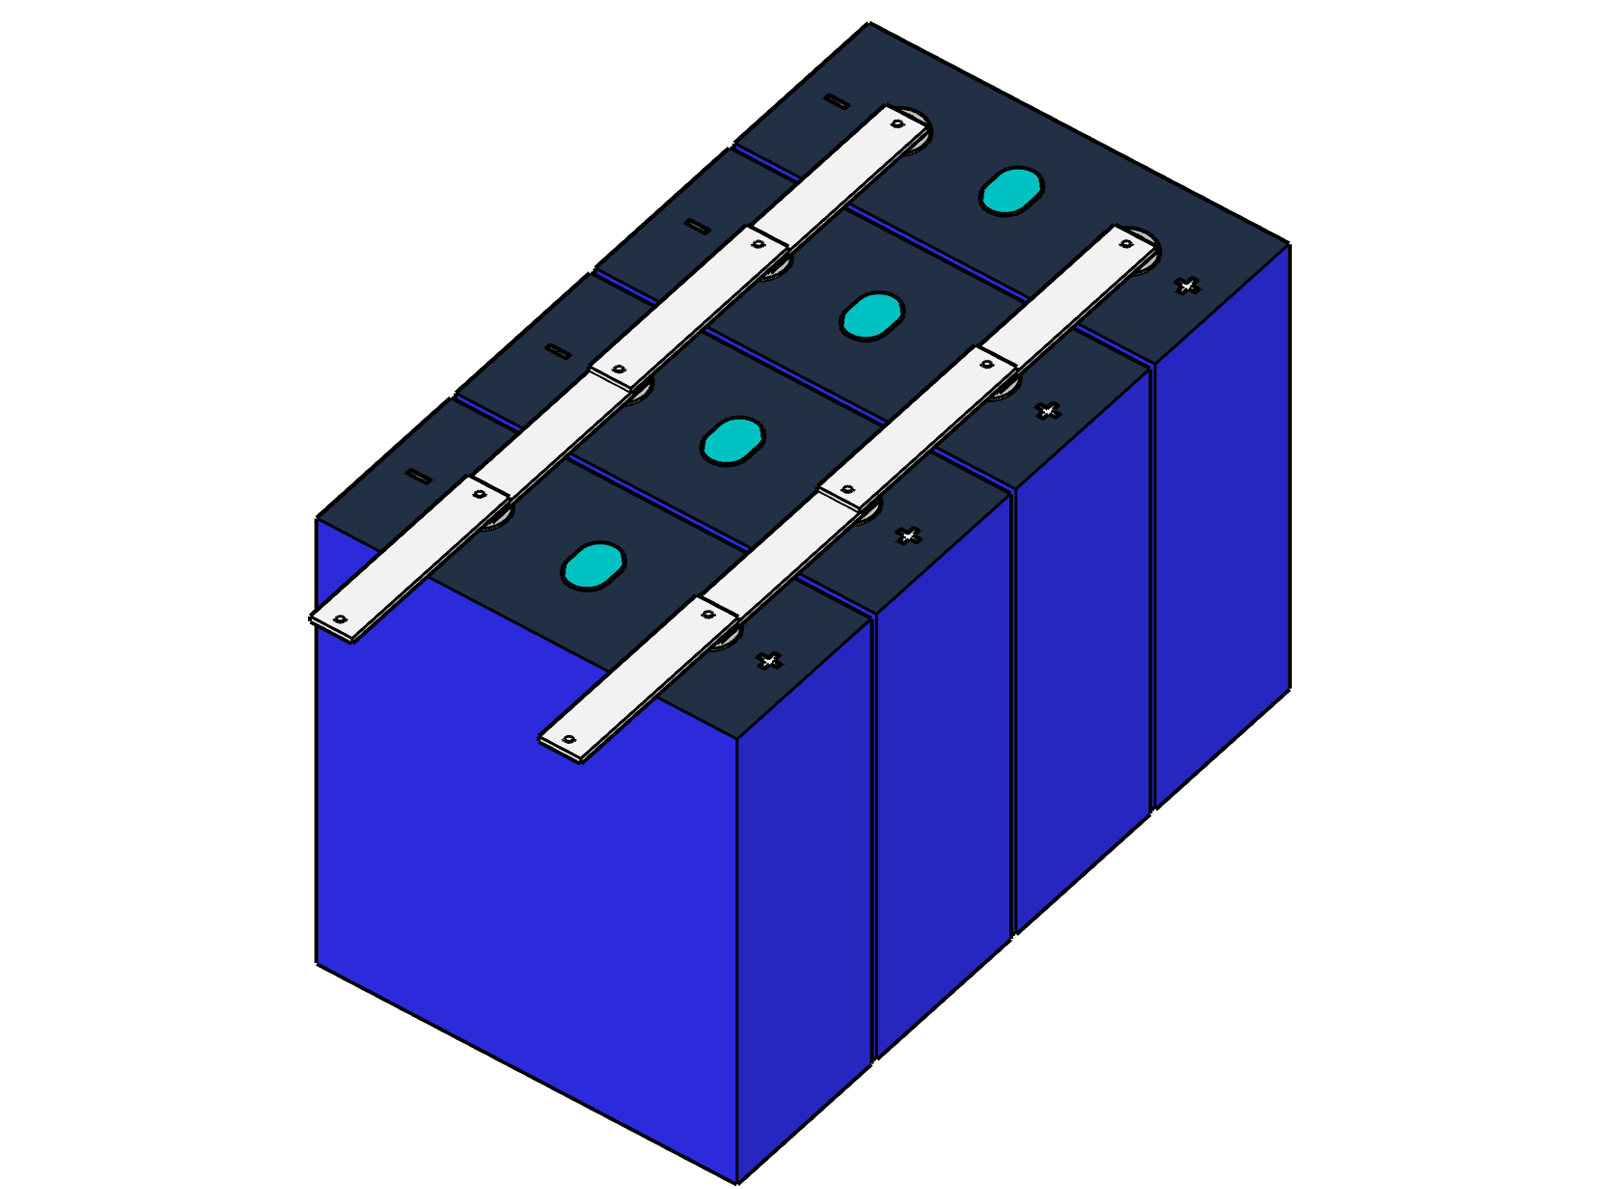
Connect the four cells in parallel as shown in the picture. Note that, this time, positive terminals are connected with positives and negatives with negatives
-
Connect a Power supply to the main positive and main negative of the new pack
-
Set the voltage of the power supply to 3.65v and let it charge until the current (i.e. the Amps display) of the Power supply drops to 0
-
Use your multimeter to check that all cells have an individual voltage of around 3.65v
-
Disconnect the power supply and disassemble the pack. You can now go ahead and build your battery as described above
Resources
DIY battery with BMS assembly (same procedure, lower specs)
Top balancing your cells before assembling them into a battery (optional), you will need a Power supply if you want to do this
Capacity test your battery after assembly (optional), you will need a capacity tester if you want to do this